In this tutorial, we’re going to explore some non-destructive image editing. With these techniques, you can bring out the best in an image, or absolutely destroy the graphic, but still keep the original photo intact.
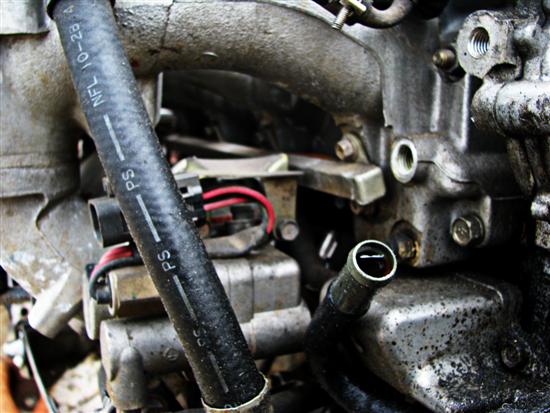
So to begin, find a photo that you’d like to make dirty. Something that might feel bland as is, and could use more of a grungy feel. Here is what I’ll be using:

Crank the Colors
Now, we want to increase the contrast and the intensify colors of the photo, but do it in a non-destructive way (by non-destructive, I simply mean we do not want to lose the data from the original image as we modify the appearance of our graphic). How do we do this? We use layers, of course.

First, Duplicate the Layer. Then, go to the layer’s blend modes and select Hard Light. This setting will multiply any color darker than 50% grey and screen any color lighter. In this case, since both the base layer and the blend layer are identical, the light colors become lighter and the dark colors become darker, with no quality lost.

As you can see, we’ve increased the image’s sharpness as well as its saturation.
High Pass for Sharpness
The High Pass filter gives a photo that refined, sharp look that is hard to obtain using only a camera. Once again, this is a non-destructive way of adding more life to your photos.
Make a new duplicate of the original layer. For now, you can make the first duplicate invisible. Set the new duplicate’s blend to Hard Light as well.
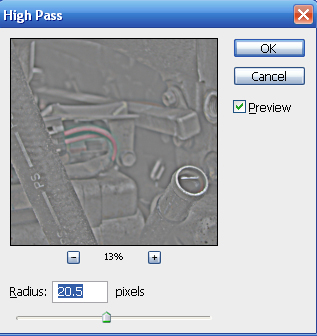
Now, Go to Filters > Other > High Pass.

The High Pass filter sets it’s source image to 50% grey, and as you increase the amount on the slider, it reveals more of the image, in higher contrast areas at first, such as edges or lines.
The amount you should use of the filters varies. Too little causes no effect. To much, and the image gets halo’s and uneven blotches of more intense color. The the amount you should use really just depends on the kind of results you desire.

Mix and Match
Right now, in your layers panel, you should have three layers: the original as the background, the high pass layer, and then the direct duplicate. Both additional layers, if you haven’t tried by now, can be turned visible and invisible. Depending on your personal preference, you can choose one of these methods or the other, or even repeat a method, and combine these layers for different results. I just stuck to one of each layer for this image.
Tint and Grain

Now that our photo is more defined and sharper, we can add the finishing touches to really grunge it up.
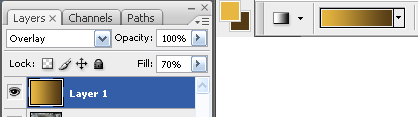
Create a new layer and set its blend mode to Overlayd. Pick two similar colors, one light and one dark to paint as a gradient. For this photo, I picked two browns, to give the image an earthen tone.

Fill the blank layer with the gradient. It can be vertical, horizontal, radial, whatever you find looks good. For this I chose a nice horizontal fade. If the color is a bit stronger than what you wanted, just lower the Fill amount to the point you’d like.

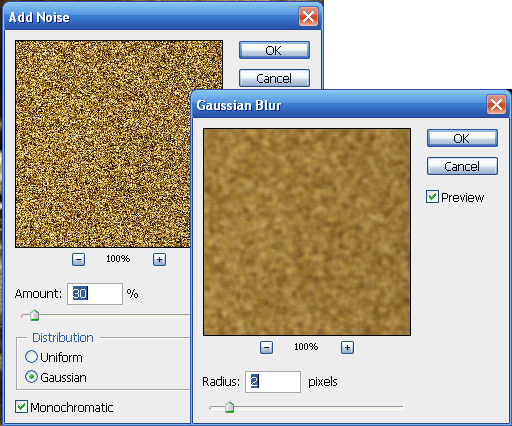
Now, the image is tinted, and looking fantastic. It’s time to mess it up a little. Go to Filter > Noise > Add noise. Make the noise monochromatic, and set it so somewhere around 30%.

The resulting grain looks good, but it’s a bit too unnatural. A Guassian Blur (Filter > Blur > Gaussian Blur) at about 2 pixels smooths it all out, and viola!

We have a natural, sharp, dirty photo, and with very little effort!
'인터넷과 유틸 > photoshop' 카테고리의 다른 글
| Create the Glass Shelf Dock from Leopard OS in Photoshop (0) | 2014.11.03 |
|---|---|
| Amazing Retro Rainbow Curves (0) | 2014.11.03 |
| Quick and Painless Image Vectoring (0) | 2014.11.03 |


